Sunday, July 1, 2012

Quick update...more to come

 bebe g is a growin. thought an update might be in order.
have some fun house and client projects to share later in the week.
 enjoy your sunday!

post signature

Wednesday, May 30, 2012

Baby G

that's right. we are pretty pumped to add a little to our house.

19 weeks plus junk in the hotel room floor
if you give a mouse a cookie(or a house)...
little hanky mouse a while back
she will want bebes to fill all the rooms in her house.

12 weeks
14 weeks
16 weeks
18 weeks
 jeff is real devastated...he feels like his bump is growing with mine:)
can't wait for october!!
post signature

Tuesday, April 17, 2012

Hand Painted Union Jack Dresser

this project was a fun one. let me tell ya, the mama of this bebe is one FASHIONABLE mama. as in looks so stinking cute when in the last month of pregnancy...impressive:) ashley, had the vision for a hand painted union jack dresser. i had the privilege of figuring out how to translate the design to this vintage dresser. it was a ton of fun. here is the final product:


here is a shot of the dresser in the nursery. this is a great visual for how to use a dresser as a changing table...works like a charm!!


post signature

Tuesday, April 3, 2012

A little house update

i can't believe it's been so long since i posted...where did march go? 
anyway, here is a little update in our, now, dining room. we enclosed our back patio and added this indoor space. i originally thought i'd use it as a little sitting area in my kitchen. then i realized no one was sitting there. then i put the dining table in there and put out munchies when people came over...and they sat there.
i wanted a subtle stripe pattern. the lighter gray is actually a champagne metallic color.
 the stripe colors are metallic champagne, darker gray(like in the herringbone room) and then the wall color, white.
 i also hung my floating shelves on the stripe wall. i really like the dimension they add. i made the mistake of hanging them way too close together in our old place. i decided to just hang two, and to give them lots of space to breathe between one another.
 i am glad i did...it will be much easier to style them this way.
i'll update you again, once i buy everything to style the shelves with. i have plans for large format photos in this space!
post signature

Wednesday, February 29, 2012

silver leafed mirrors

i silver leafed some mirrors for a client a while back and they turned out awesome!
they started out gold...which was all wrong for our space.
they ended sliver leafed. pretty cool, huh?!
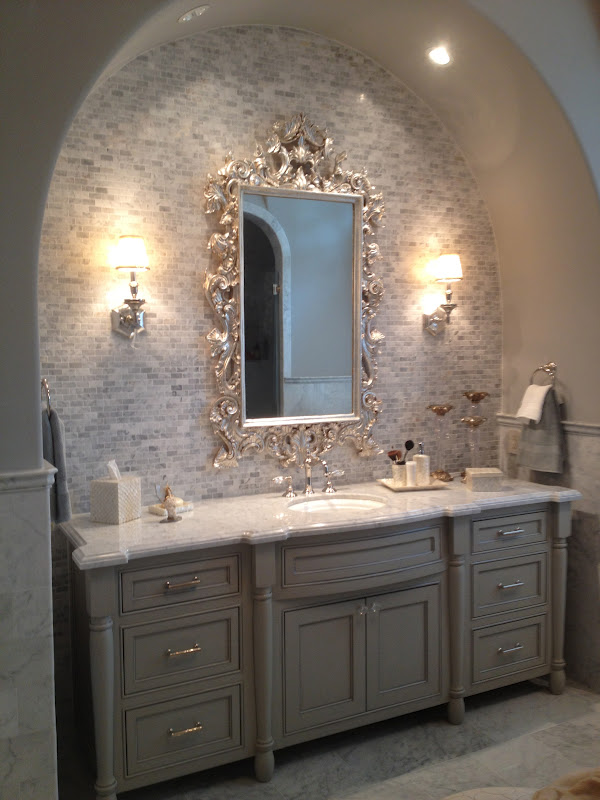
you can see the two mirrors(notice the reflection of the second mirror in the first mirror) in the above shot. one mirror is hung above each, his and hers vanity.
here are some detail shots:
 this is the mirror above the wife's area

silver leaf is hard to beat. you can make it crack, smooth, lacquer it, glaze it. it's so versatile and sophisticated.


 and this is the mirror above the husband's area
 again, you can see both mirrors in the above shot.
 i also like that silver leafing a piece allows an aged/vintage feel, without any sanding or distressing. to me, that is what helps silver leafing keep its sophisticated edge. 

have you ever attempted silver leafing anything?
post signature

Friday, February 24, 2012

hacienda chic bathroom

i recently had a blast working on a hacienda chic bathroom. i had the walls painted a warm copper color and then applied a faux finish to make the walls look like terra cotta. i also refinished the vanity to resemble mexican tiles. this was a fun one!


do you like the hacienda chic style?

post signature

Wednesday, February 22, 2012

DIY framed chalkboard

for christmas this year, my sister wanted a framed chalk board. this project is simple and fun to have around.
 
ready to make your own?
first you need to select your frame. i wanted one with a bunch of detail.
next select the color of your frame, or leave it as is. i wanted to paint this frame purple, since that is abbe's favorite color.
next spray paint the frame. you'll want to prime it with a latex spray primer first. the best advice i give when spray painting is to paint very thin even coats. i also recommend working outside and wearing a mask.

be sure not to put down a drop cloth so that your grass can be forever primed with a touch of plum...your husband will love that! :)
next have a sheet of masonite cut to fit inside your frame. i had this done at home depot. 
after that, paint the masonite with chalkboard paint. then slide it into place inside the frame. don't forget to make sure that the chalkboard side is facing the correct side of the finished frame.
here is a simple tip, that i think is the most beneficial tip of the tutorial. rather than gluing the masonite into place, tack it into place with small tack nails. this supports the board much better.


then write away!

enjoy making your own framed chalkboard.


post signature